

What is “Manual Reconciliation” and how to do?
QuickBooks Online allows both downloading transactions directly from Bank and entering transactions traditionally as you would.
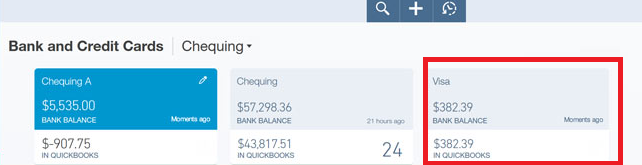
When you use the feature of “Download transactions” from Bank and allocate it in QuickBooks, wherein no additional reconciliation is required.
As the below diagram shows (if Balances are matched, no more reconciliation required)
But, for those who do not want to switch to this feature of “downloading transactions” and want to continue entering transactions the traditional way and do reconciliation,
QuickBooks Online does offer manual reconciliation.
The below screens will show how to extract the same:
Step 1: Select “Reconcile”
Step 2 :
Select your Bank and click “Reconcile”
Step 3 :
Enter Ending Balance, Statement Ending Date and Service charges and click “OK”
Step 4 : (as shown below)
- This box displays summary of reconciliation.
- Assign a check mark to hid transactions after the statement’s end date. i.e. if you have entered Statement Ending date as “July 31st 2015”, transactions after that date will not be listed.
This can be helpful if you are clearing previous months transactions, so as not to get full list of transactions.
Assign a check mark to the cheques / deposits which are cleared, matching with Bank Statement.
Step 5 :
Click “Finish Now” if your Books and Banks are reconciled.
You also have option of “Finish Later” if the balances are not matching and come back and start from where you have left.
Step 6: If your statements are matching you will get next option to view your “Reconciliation Report” (Shows as below)
Step 7 :
If your statements are not matching and if you select “Finish Now”, QuickBooks will automatically “create adjustment for difference” transactions.
Other links for Bank Reconciliation
https://www.youtube.com/watch?v=MgF2nkWvKCQ


